
Symbol Manager
Video Tutorial
New beeTrader – Symbol Manager
Understand the Symbol Manager function

Symbol Manager is the utility that allows the creation of assets to be used in beeTrader.
The beeTrader installation includes about a hundred assets including stocks, futures, indexes, bonds, etf. The assets that are present by default cannot be modified by the user and will be updated automatically (for example the expiry of a futures, modification of a symbol by the broker).
Right-click menu

- New Futures Chain: start the procedure to associate the derivatives chain with the asset for use in Options Strategy. The procedure is explained below on this page;
- New Options Chain: start the procedure to associate the asset chain with derivative options for use in Options Strategy. The procedure is explained below on this page;
- Dividends: allows the entry of dividends with relative date. The inclusion of dividends is highly recommended for the proper management of a Options Strategy. For more information on dividends, click here;
- Clone: clones the selected asset, keeping all the parameters except for the name and link symbols to the brokers;
- Delete: delete the selected asset.
Explanation of an already entered asset

Let’s analyze for example the DAX 30 Index. In this specific case, the asset has been included for trading with options, since the (underlying) index is not tradable, but the futures and related options are.
The first block of information is therefore related to the underlying and presents:
- Name: is the name of the asset that will be used in beeTrader;
- Isin: is the unique identifier of the asset, this field is not mandatory;
- Expiry: is the expiry date of the asset. This field is enabled only if the chosen Category is subject to expiration;
- Point Value: is the value of each point of variation of the asset;
- Lot Size: is the number of underlyings included in a derivative contract of the asset (futures or options), in other cases 1;
- Category: is the type of asset;
- Market: is the market in which the asset is traded. Once the market has been selected, this will act exclusively as a filter for sending automatic orders. Orders will therefore be sent only during the set trading hours. If the desired one is not present, it is possible to create them as desired using the Markets;
- Sector: is the sector of belonging of the asset. If the desired one is not present, it is possible to create them as desired using the Sectors;
- Currency: is the currency in which the asset is traded. If the desired one is not present, it is possible to create them at will using the Currencies;
- Tick: is the minimum variation of the asset. If the desired one is not present, it is possible to create them as desired using the Ticks button. The set value is used whenever the minimum tick value is not provided by the broker.
There are also buttons with the name of the brokers to which beeTrader can connect. These buttons can be green if the symbol has been set to connect the asset to the broker, or red if no symbol has been set.
The second block of information is related, as the title implies, to the futures derived from the underlying and presents:
- Point Value: is the value of each point of variation of the asset;
- Lot Size: is the number of underlyings included in a derivative contract of the asset (futures or options), in other cases 1;
- Market: is the market in which the asset is traded. Once the market has been selected, this will act exclusively as a filter for sending automatic orders. Orders will therefore be sent only during the set trading hours. If the desired one is not present, it is possible to create them as desired using the Markets;
- Currency: is the currency in which the asset is traded. If the desired one is not present, it is possible to create them at will using the Currencies;
- Tick: is the minimum variation of the asset. If the desired one is not present, it is possible to create them as desired using the Ticks button. The set value is used whenever the minimum tick value is not provided by the broker.
Also in this case there are buttons related to brokers, which are green if the symbol has been set to connect the asset to the broker, or red if no symbol has been set.
Note: as you can see there are two types of futures as (in the specific case of the DAX 30 Index) two types of futures are quoted that have different parameters. The future size has point value = 25 and tick = 0.5, while the mini future has point value = 5 and tick = 1.
The third block of information is related, as the title implies, to the options derived from the underlying and presents:
- Category: is the type of option, it can be Options or Options on future. The vast majority of the options belong to the first category, to the second the options that have a future as underlying, for example options on Euro Bund, on Commodities, on SP 500 future;
- Point Value: is the value of each point of variation of the asset;
- Lot Size: is the number of underlyings included in a derivative contract of the asset (futures or options), in other cases 1;
- Style: is the style of the option, by default they are always set European to make the calculations of beeTrader faster while guaranteeing an excellent approximation;
- Method: is the calculation method used for theoretical prices, by default Black & amp; Scholes to make the beeTrader calculations faster while ensuring a good approximation;
- Market: is the market in which the asset is traded. Once the market has been selected, this will act exclusively as a filter for sending automatic orders. Orders will therefore be sent only during the set trading hours. If the desired one is not present, it is possible to create them as desired using the Markets;
- Currency: is the currency in which the asset is traded. If the desired one is not present, it is possible to create them at will using the Currencies;
- Tick: is the minimum variation of the asset. If the desired one is not present, it is possible to create them as desired using the Ticks button. The set value is used whenever the minimum tick value is not provided by the broker.
Also in this case there are the buttons related to the brokers, which are green if the symbol has been set to connect the asset to the broker, or red if no symbol has been set.
Adding a new asset
The addition of a new asset, as we have seen, takes place in 3 steps which we will analyze below in detail. Remember that the assets already present cannot be modified, while those created by you can be modified at will.
It is advisable to see how similar tools already encoded in order to avoid errors are coded.
Let’s now add, for example, the FTSE MIB 40 Index with related Future Chain and Options Chain in order to be able to use both futures and options in the Options Strategy . To have a future available for the Chart or Watchlist it is necessary to create an asset that is not dependent on an underlying asset.
Click the New button -> New Asset

In this window the parameters of the asset must be inserted, in particular those proper to the asset, not dependent on the symbols of the various brokers that we will see below.
- Name: type in a name at will;
- ISIN: non-mandatory field in which to type the unique code isin of the asset;
- Category: select the category to which the tool belongs from those available. If the desired category is not available, you can create new ones with the Categories button;
- Expiry: if the category chosen previously is subject to expiration, this field is enabled, enter the expiry date of the asset in YYYY-MM-DD format;
- Point Value: type the value of each point of variation of the asset;
- Lot Size: type the number of underlying items that are included in a contract;
- Market: select the market in which the asset is traded from those available. Once the market has been selected, this will act exclusively as a filter for sending automatic orders. If the market you want, you can create new ones with the Markets button. Also from the Markets button you can see the trading hours set for each market;
- Sector: select the sector the asset belongs to from those available. If the desired sector is not available, you can create new ones with the Sectors;
- Currency: select the currency with which the asset is traded among those available. If the desired currency is not available, you can create new ones with the Currencies;
- Min. Tick: select the minimum variation of the asset from those available. If the desired minimum tick is not available, you can create new ones with the Ticks button.
Select the newly created asset, click the New button -> Futures Chain

The creation of the Future Chain means that the futures can be used in the Options Strategy. To have a future available for the Chart or Watchlist it is necessary to create an asset that is not dependent on an underlying asset.
Also in this window the parameters of the futures relative to the underlying asset must be inserted, in particular those proper of the futures, not dependent from the symbols of the various brokers that we will see below.
- Point Value: enter the value of each point of variation of the asset. In this case you are entering the future mini, so point value = 1 ;
- Lot Size: type the number of underlying items that are included in a contract;
- Market: select the market in which the asset is traded from those available. Once the market has been selected, this will act exclusively as a filter for sending automatic orders. If the market you want, you can create new ones with the Markets button. Also from the Markets button you can see the trading hours set for each market;
- Sector: select the sector the asset belongs to from those available. If the desired sector is not available, you can create new ones with the Sectors;
- Currency: select the currency with which the asset is traded among those available. If the desired currency is not available, you can create new ones with the Currencies;
- Min. Tick: select the minimum variation of the asset from those available. If the desired minimum ticm is not available, you can create new ones with the Ticks button.

Also in this window the parameters of the futures relative to the underlying asset must be inserted, in particular those proper of the futures, not dependent from the symbols of the various brokers that we will see below.
- Point Value: enter the value of each point of variation of the asset. In this case we are entering the future size, so point value = 5 ;
- Lot Size: type the number of underlying items that are included in a contract;
- Market: select the market in which the asset is traded from those available. Once the market has been selected, this will act exclusively as a filter for sending automatic orders. If the market you want, you can create new ones with the Markets button. Also from the Markets button you can see the trading hours set for each market;
- Sector: select the sector the asset belongs to from those available. If the desired sector is not available, you can create new ones with the Sectors;
- Currency: select the currency with which the asset is traded among those available. If the desired currency is not available, you can create new ones with the Currencies;
- Min. Tick: select the minimum variation of the asset from those available. If the desired minimum ticm is not available, you can create new ones with the Ticks button.
Select the asset created above, click the New button -> Options Chain

The parameters of the options relating to the underlying asset must now be entered, in particular those specific to the options, which do not depend on the symbols of the various brokers that we will see later.
- Category: choose between Options or Options on future. The vast majority of the options belong to the first category, the options to which the underlying is a future, for example options on Euro Bund, on Commodities, on SP 500 futures;
- Point Value: type the value of each point of variation of the asset;
- Lot Size: type the number of underlying items that are included in a contract;
- Style: is the style of the option, by default they are always set European to make the calculations of beeTrader faster while guaranteeing an excellent approximation;
- Method: is the calculation method used for theoretical prices, by default Black & amp; Scholes to make the beeTrader calculations faster while ensuring a good approximation;
- Market: is the market in which the asset is traded. Once the market has been selected, this will act exclusively as a filter for sending automatic orders. Orders will therefore be sent only during the set trading hours. If the desired one is not present, it is possible to create them as desired using the Markets;
- Currency: is the currency in which the asset is traded. If the desired one is not present, it is possible to create them at will using the Currencies;
- Tick: is the minimum variation of the asset. If the desired one is not present, it is possible to create them as desired using the Ticks button. The set value is used whenever the minimum tick value is not provided by the broker.
Cloning an asset/symbol
In Symbol Manager it is possible to add a new symbol starting from the settings of an existing one. The procedure to do this is very simple and can be used when there is the need to create an asset / symbol that is not present among the default ones but that has many characteristics in common with one already present, mainly the same exchange / market.
Let’s take as an example the addition of the share Domo inc. on the US market NYSE-NASDAQ.

- Open the symbol manager and look for a share among those already present that has the same stock exchange / market, such as 3M co. Select 3M in the symbols list, then right click on it to view the pop-up menu, and click on the “Clone” command.
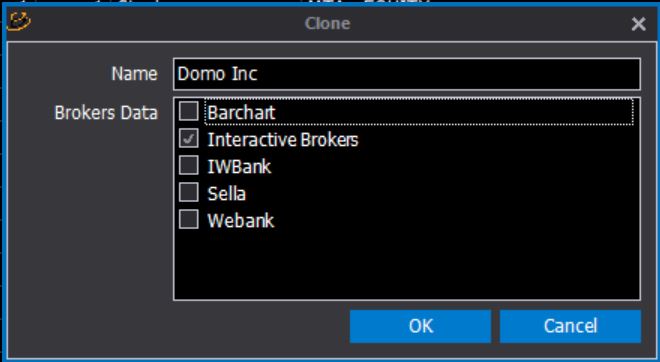
- A window will appear asking for the name of the asset / stock that we are entering and for which provider / broker to clone the data for, in order to be able to receive realtime prices. In our example we are going to insert it only for the Interactive Brokers TWS. When everything is setted up correctly, confirm the changes with OK.
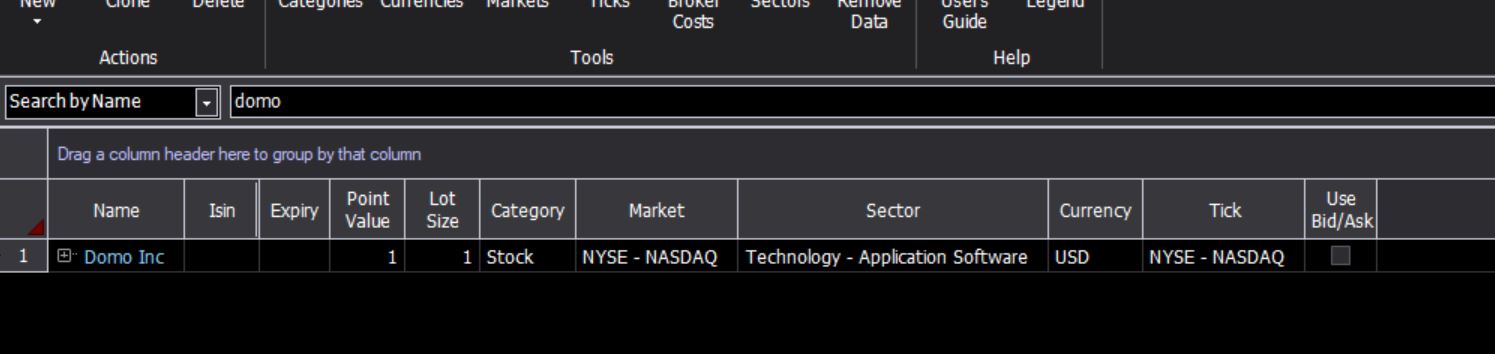
- Now search the symbols list for “Domo” to find the cloned line just inserted in order to modify the symbol for the connection and all the characteristics of the asset / action.

- First we check the disaplayed settings in the selection line are correct such as Category, Market Tick, etc. If we have correctly selected the instrument to be cloned, the only property that must be changed is the sector it belongs to. In our example, 3M belongs to the chemical sector, while Domo to the Technological / software application. This can be achieved with a simple double click on the field, select the correct sector from the drop-down menu, and confirm with the ENTER key.
- Click on the + at the beginning of the line to expand the all the symbol’s features, so you can see that the IB button is the only one active as it is the only provider we selected earlier. The new cloned symbol still has all the exact same values as the initial symbol. To change these values, double click on the highlighted provider button, opening a window with the required fields. In our example, the only property that we have to change is the symbol. Replace MMM (symbol of the stock we have cloned) with DOMO (symbol of the new stock that interests us) and confirm with OK.
- Repeat the same operation for all IB buttons (Underlying / Stocks, Futures and Options) changing from MMM to DOMO to complete the procedure.

- To find the new asset / stock / symbol just inserted through the cloning procedure in the beeTrader symbols selection list, restart beeTrader or, alternatively, in the beeTrader Symbol Selection window, click on the Reload Symbols List button.
Connect an asset to the broker
Previously an asset was created (with future and options chain) setting all the parameters proper to the instruments. Below are the links to the specific manual pages for each broker, which contains detailed instructions for coding the symbols needed to connect beeTrader with the various brokers.


Binck Bank ed IQFeed
dont’t use Symbol Manager.