
Options Strategy – Planning
Video Tutorial
[/three_col_col3]Understand the Planning function

BeeTrader section destined for the automation of options strategies. Planning is a powerful, simple and intuitive function to automatically perform scheduled operations (Plan) at certain times.
A Plan is a flow chart consisting of:
- Start: the start of the plan;
- Conditions: the conditions that the system will verify;
- Actions: the actions that the system will implement when the conditions occur;
- End: closing the plan:
- Junctions: of the hubs that can be used to merge and then share the links, in order to visibly improve the plan;
- Links: links between the components of the plan.
Lets see below a detailed description of the various components.
Start
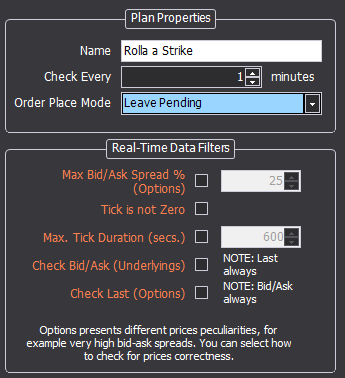
The starting point of the plan. Once the Start button has been selected and the object is positioned, proceed with the compilation of the main properties of the plan and any filters that inhibit the control of the set Conditions. It is therefore advisable to take care in setting sensible filters.
- Name: name of the plan;
- Check Every: interval, in seconds, between plan executions;
- Order Place Mode: choose between Leave Pending (the generated order remains pending, pending finalization by the user). Paper Trading (the generated order is automatically finalized in Paper Trading) . Real Market (DOM) (the order generated opens the DOM, pending finalization by the user in Real Market). Real Market (Automatic) : the generated order is finalized in Real Market to the type of price set on the corresponding Action;
- Max Bid / Ask Spread% (Options): verifies that the spread between Bid and Ask of the options present in the strategy does not exceed the set percentage;
- Tick is not Zero: verifies that the last tick received for each instrument of the strategy is not 0;
- Max Tick Interval (secs): verifies that the interval between one tick and the next occurs within the set time, for each instrument of the strategy;
- Check Bid / Ask (Underlying): verifies that the Bid and Ask prices of the underlying are actually present in the market;
- Check Last (Options): check that the option on which the order should be made has a valid Last price;
Conditions
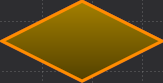
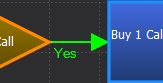
The conditions to be verified: Once the Conditions button is clicked and the object is positioned, proceed to compile the parameters. The objects must be connected to each other according to the logic of their plan. Start must be linked to Conditions by means of a Generic Link , while Conditions must then be linked to Actions with a Yes Link (if the conditions are verified, then the response to the conditions is YES is executed the actions) or possibly a No Link (if the conditions are not verified, then the response to the conditions is NO the actions is performed).
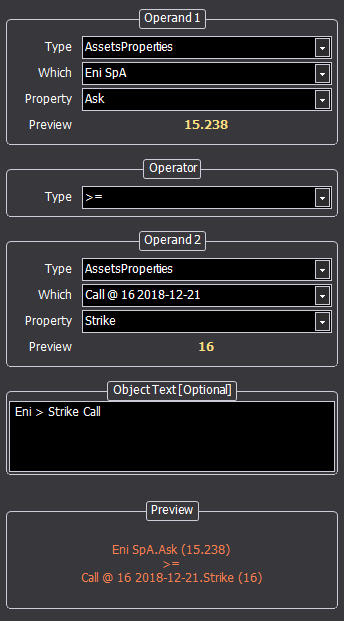
- Operand 1: assign the first term of the comparison, this can be a property of an asset, a property of the strategy, a property of a plan or a custom value set by the user;
- Operator: assign the mathematical property that must occur between the two operators;
- Operand 2: assign the second term of the comparison, this can be a property of an asset, a property of the strategy, a property of a plan or a custom value set by the user;
- Object Text: in this field the user can assign a short note which will be shown in the plan within the condition;
- Preview: a preview of the set condition is shown in the box.
Note: based on the type of instrument selected in Operand 1 and Operand 2 under the Type item, the system proposes possible Which and the relative Property. If, for example, the Type AssetProperties is selected, the system proposes among the Which the available Assets, then the underlying, the legs or the futures. Once selected the Which you want in the Property the system proposes the list of available properties for that particular Which.
Actions

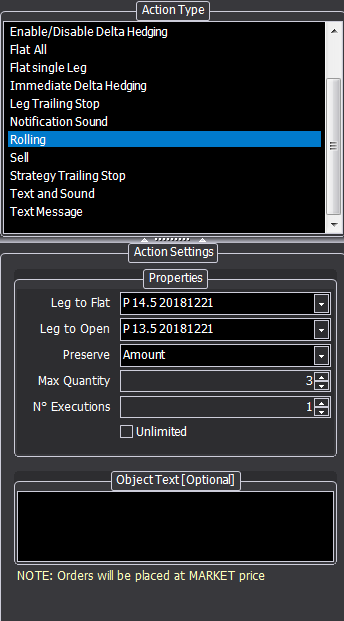
The actions to verify: Once you have clicked the Actions button and positioned the object, proceed to compile the parameters. As seen above, the objects must be connected to each other according to the logic of their plan. Conditions must be linked to Actions with a Yes Link (if the conditions are verified, then the response to the conditions is YES the actions is performed) or possibly a No Link (if the conditions are not checked, so the response to the conditions is NO the actions are performed).
For each Action Type selected at the top there are several Action Settings at the bottom. In Action Settings all the parameters that can be set relating to the selected Action Type are collected.
For Buy and Sell Actions, the function Smart Move that automatically changes orders based on the selected settings. For more information on Smart Move, click here.
The number in the upper right corner of the red circle indicates the number of executions left for that specific action.
End
The end of the plan: Once the End button is selected and the object is positioned, like Start, the main properties of the plan and any filters that inhibit the control of the set Conditions appear. It is therefore advisable to take care in setting sensible filters.
- Name: name of the plan;
- Check Every: every how many minutes the conditions of the plan must be verified;
- Order Place Mode: choose between Leave Pending (the generated order remains pending, pending finalization by the user). Paper Trading (the generated order is automatically finalized in Paper Trading) . Real Market (DOM) (the order generated opens the DOM, pending finalization by the user in Real Market). Real Market (Automatic) : the generated order is finalized in Real Market to the type of price set on the corresponding Action;
- Max Bid / Ask Spread% (Options): verifies that the spread between Bid and Ask of the options in the strategy does not exceed the set percentage;
- Tick is not Zero: verifies that the last tick received for each instrument of the strategy is not 0;
- Max Tick Interval (secs): verifies that the interval between one tick and the next occurs within the set time, for each instrument of the strategy;
- Check Bid / Ask (Underlying): verifies that the Bid and Ask prices of the underlying are actually present in the market;
- Check Last (Options): check that the option on which the order should be made has a valid Last price.
Junctions
The junctions can be used in the diagram, where necessary with the sole purpose of possibly improving the graphical aspect of a Plan in case there are many links with overlaps.
Links
The links are of three types:
- Generic Link: used to link all the objects in a plan, except for the link between conditions and actions;
- Yes Link: used to link conditions to actions if you want the occurrence of the condition to implement the linked action;
- No Link: used to link conditions to actions if you want the not occur of the condition to implement the linked action.
The status of a Plan

Un Plan può avere quattro stati:
- Editing: the plan is being modified, so it is possible to add, remove or modify its components;
- Inactive: the plan is not active and no changes to it are possible;
- Active but Disabled: the plan is active (check box next to it) but it is not enabled, so it does not work;
- Active but Enabled: the plan is operational. It is both active (checkbox alongside) and enabled (menu button in Planning and General).
The creation of a Plan

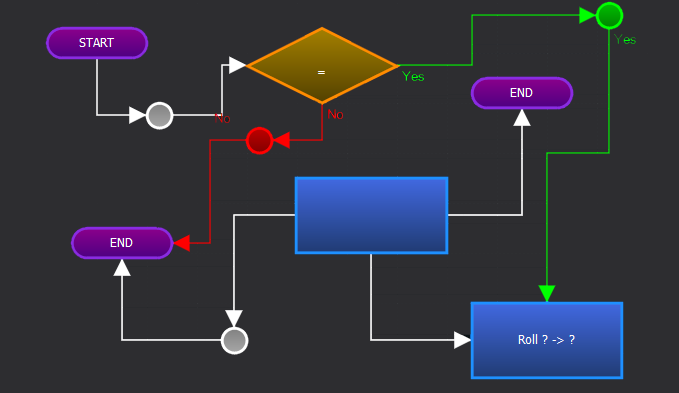
The plan just created is being edited. The first operation to do is to assign to the plan a name that is as explanatory as possible; this helps if there are more plans on the same options strategy. Once assigned the name, proceed with the insertion of the Start object which starts the plan.

![]()
Subsequently the conditions that the system will evaluate enter ( Conditions ). In the example if and when the underlying (Eni SpA) will be greater than or equal to the strike of the call sold (16.5) the action that we are going to set later will be performed.
In Operand 1 you choose AssetsProperties → Eni → Last (the Preview shows the current value), in Operator di chooses & gt; =, in Operand 2 you choose AssetsProperties → The call 16.5 → Strike (the Preview shows the current value).
In Prewiew, at the bottom, we read what is set, if it is what you wanted to get, you just have to press the Confirm button and the conditions will be saved.
It is possible to insert a text (Object Text) that will be replaced inside the object.

Now you need to set the actions ( Actions ) that will be performed when the previously set conditions occur. In the example, there is a rolling operation for the put side and two operations (closing the leg touched and opening a new one) which will be executed in sequence.
The rolling operation is carried out automatically, it is sufficient to set the leg to be closed, the one on which to roll and in case of choice to preserve the prize, the maximum number of contracts of the new leg.

In conclusion we proceed to the addition of the End object on which the final parts of the plan will flow. As you can see, the Yes Link links were used to link the conditions to the actions, and the Generic Links in all other cases.
The Test Plans
The Test Plans is a function that, by creating a forward graph of the underlying, allows you to test the plan and verify the results. The Test Plans window consists of three sections that we will analyze later.
Note: The prices of future options are calculated starting from the last volatility surface acquired.
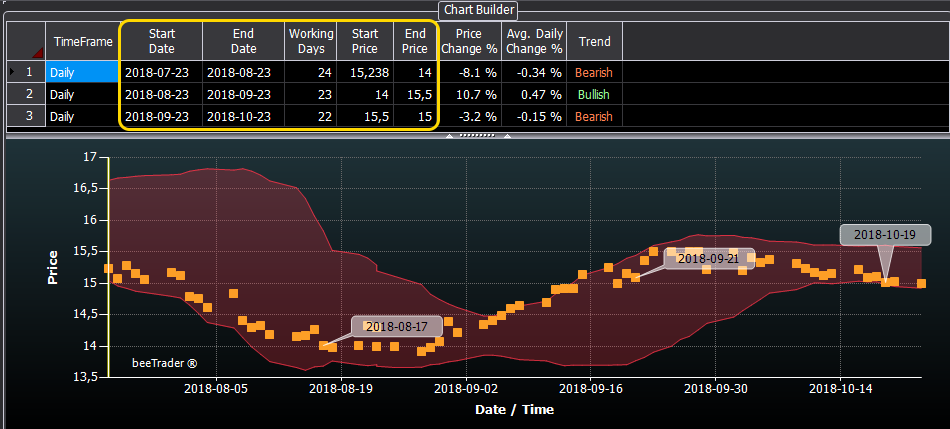
Chart Builder
In this section the different segments that make up the forward graph of the underlying are set. For each segment it is possible to set the start and end dates, the initial and final price.
As the segments are created, the graph is composed randomly, assuming the trend of the underlay between the dates and the prices set by the user.
The Start Date, End Date, Start Price and End Price fields are editable, the other fields are calculated and provide an indication of the set price deviation.

Plan Preview
Once the segments have been created, the plan is enabled and the simulation is started via the menu’s Play button. At this point the system scrolls on the forward graph and for each point it is necessary to check whether the conditions have occurred and eventually execute the actions. With the mouse wheel it is possible to zoom the plan.
.
Simulation Results